How to Create a Highly Available AWS Infrastructure for Hosting a Simple Web App Using Ansible


Table of contents
- Introduction
- The Ansible Playbook
- Step One: Provisioning the VPC
- Step Two: Create an AutoScaling Group
- Step Three: Create the Application Load Balancer
- Step Four: Create Route53 Records
- Step Five: Request a Public Certificate from AWS Certificate Manager and update the Application Load Balancer Listeners
- Step Six: Include the Roles in the main.yml file
Introduction
For Altschool Africa’s holiday challenge, students in the Cloud Engineering track were required to deploy a highly available AWS infrastructure to host a simple web app that displays the hostname of each server (that’s the gist of it).
Planning for High Availability
Highly available infrastructure is designed to handle failures and continue to operate without interruption.
Several key considerations should be taken into account to ensure that the application can handle failures and continue to operate without interruption. Some of these include:
Redundancy: One of the most important considerations is to ensure that there is redundancy built into the system so that if one component fails, there is another component that can take over and keep the system running. This can include implementing load balancers and deploying the servers in different availability zones. Load balancers come with built-in redundancy, this means that when one server fails, the load balancer will divert all the traffic to another server without affecting the user.
Failover: This is the mechanism in place that can automatically switch to a backup system or component in the event of a failure. Load balancers have automatic failover.
Scaling: This is the ability to effectively scale up or down based on demand. This can include implementing autoscaling groups for the automatic scaling of servers.
It is important to have a security plan in place that covers all aspects of the infrastructure, including network security and encryption. AWS Certificate Manager allows you to request a public certificate to secure your web application.
Taking these considerations into account, you can design a highly available web application that is resilient to failures, secure, and can continue to operate in the event of unexpected downtime.
By using Ansible, it will be easier to automate many of these processes and provide a more consistent and reliable approach.
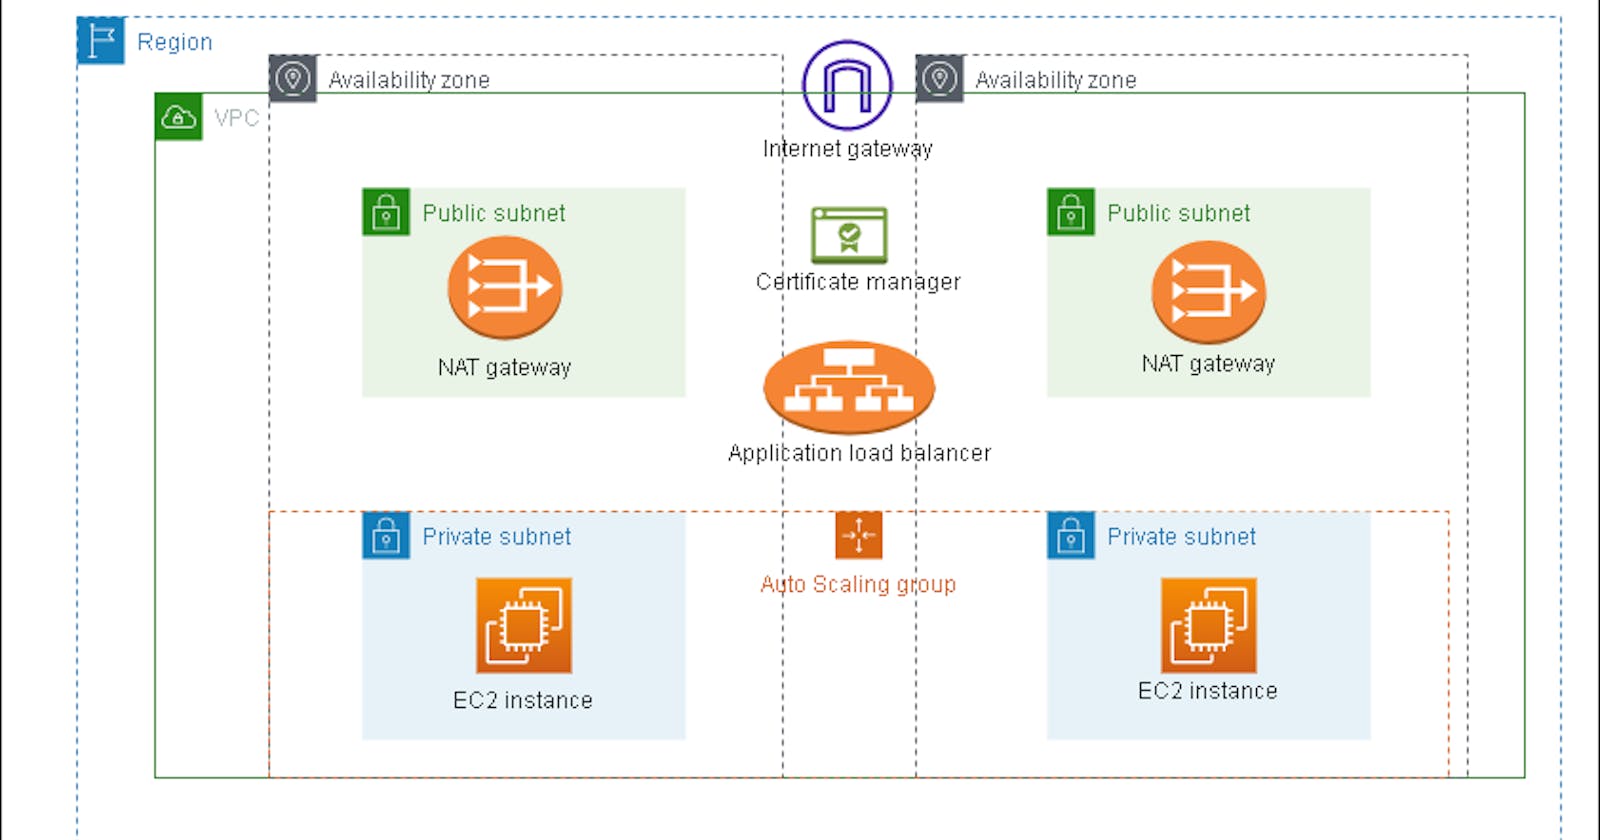
The Architecture Diagram
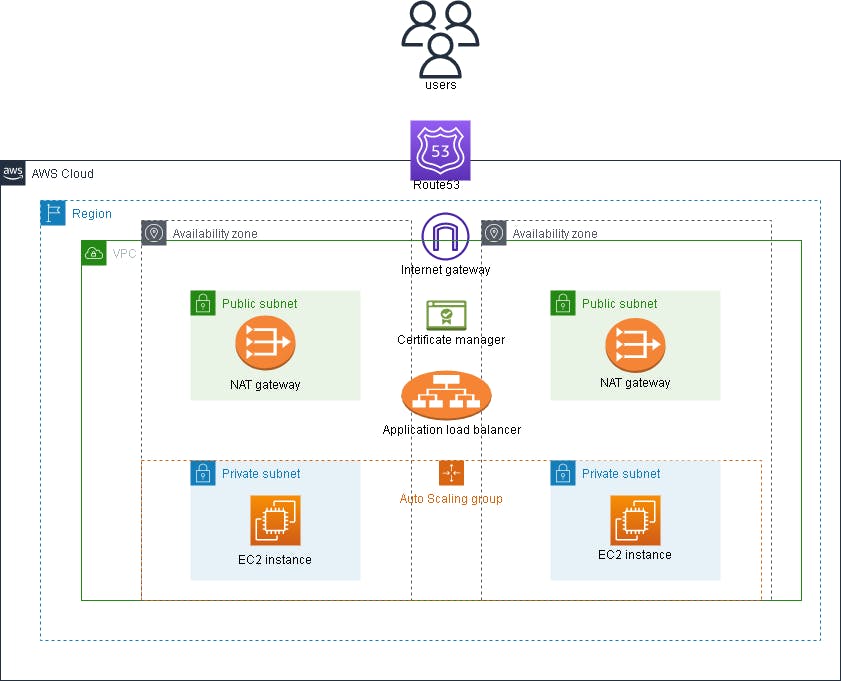
AWS architecture diagram for a highly available infrastructure
Pre-requisites
This article guides beginners on automating the provisioning and configuration of AWS resources with Ansible. Before starting, ensure you have a basic understanding of creating AWS resources through the AWS Management Console and some experience using Ansible for automation. If you lack knowledge in either of these areas, familiarize
yourself with the basics before proceeding. We will not cover the basics of creating IAM roles or the process of selecting a CIDR range for your VPC and subnets.
The following steps should be taken before proceeding with the playbook:
- Create an IAM role with:
AmazonVPCFullAccess
AmazonEC2FullAccess
AmazonRoute53FullAccess
AwsCertificateManagerFullAccess.
2. Create an EC2 instance (Ubuntu 20.04, preferably) that will serve as the ansible control node and attach the IAM role to it. This way, there will be no need to include an access key or secret key in our playbook. (This is where you will run the playbook from so it should be able to connect to the internet)
3. You should have the following software and dependencies installed:
Python3 >= 3.8.10
Ansible >= 2.12.0. Run
ansible --versionto see the version of ansible-core you have installed.pip3 (to install the latest version of boto3)
boto3 (my version is 1.26.43) — Ansible uses boto3 to communicate with AWS API to allow users to manage AWS infrastructure through Ansible modules.
sudo pip3 install boto3
You can upgrade to the latest version of boto3 by running:
sudo pip3 install boto3 --upgrade
unzip — To unzip the AWS CLI that will be downloaded
AWS CLI v2 — this is because ansible currently does not have an AWS Certificate Manager(ACM) module for requesting public certificates, hence the need for the AWS CLI.
After successful installation of the AWS CLI, configure it by running:
aws configure
The AWS CLI prompts you for the following:
Access key ID — This should be left blank
Secret access key — This should also be left blank
Region — Enter your preferred region (e.g., us-east-1)
Output format — json
The Ansible Playbook
The Ansible project tree is going to look like this:
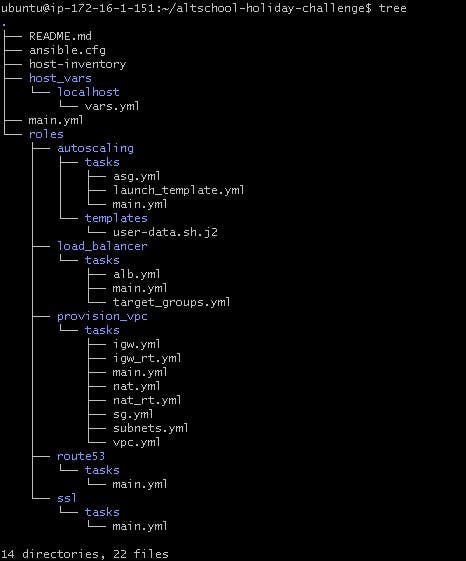
- ansible.cfg contains our configuration settings
[defaults]
inventory=host-inventory
remote_user=ubuntu
host_key_checking=false

[privilege_escalation]
become=yes
become_method=sudo
- host-inventory contains the list of hosts in which the modules and tasks in the playbook will operate
[local]
localhost
host_vars contains the variables associated with our host
roles is a directory that contains a collection of tasks, and templates which makes it easier to organize and structure the playbook.
main.yml is where each of these individual roles is consolidated to make up the entire play.
Step One: Provisioning the VPC
From the architecture diagram and project tree above, you will notice that you are creating a VPC with:
A public and private subnet each in two availability zones
An Internet gateway
Two NAT gateways in each public subnet (this is ideal for high availability, although only one is created)
A route table to route the public subnet traffic
A route table to route the private subnet traffic
A security group for the Application load balancer
A security group for the instances.
Defining the VPC variables
Create your project directory
Create host_vars/localhost directory in the root of your project directory
Create a vars.yml where all the variables needed to run the playbook will be defined.
---
# host_vars/localhost/vars.yml

# VPC variables

vpc_name: "assignment-VPC"
vpc_cidr: "172.20.0.0/16" #VPC CIDR block
aws_region: "us-east-1"
az_01: "us-east-1a" #Availability zone 1
az_02: "us-east-1b" #Availability zone 2
pub_cidr_01: "172.20.1.0/24" #CIDR for the first public subnet
pub_cidr_02: "172.20.2.0/24" #CIDR for the second public subnet
priv_cidr_01: "172.20.3.0/24" #CIDR for the first private subnet
priv_cidr_02: "172.20.4.0/24" #CIDR for the second private subnet
pub_subnet_name_01: "Assignment-pub-01"
pub_subnet_name_02: "Assignment-pub-02"
priv_subnet_name_01: "Assignment-priv-01"
priv_subnet_name_02: "Assignment-priv-02"
igw_name: "Assignment-IGW" #Internet gateway name
igw_rt_name: "Assignment-IGW-RT" #Internet gateway route table name
nat_name: "Assignment-NAT" #NAT gateway name
nat_rt_name: "Assignment-NAT-RT" #NAT gateway route table name
alb_sg: "ALB-SG" #Application load balancer security group name
instances_sg: "Instance-SG" #EC2 security group name
Next, you will move on to provisioning the VPC itself
- Create the roles/ directory in the root of your project directory.
2. Create the provision_vpc/tasks subdirectory in the roles directory.
3. Create the vpc.yml file
---
#roles/provision_vpc/tasks/vpc.yml
# Provision the vpc

  - name: Create a VPC
    amazon.aws.ec2_vpc_net:
      name: '{{ vpc_name }}'
      cidr_block: '{{ vpc_cidr }}'
      region: '{{ aws_region }}'
      dns_support: true
      dns_hostnames: true
      state: present
    register: new_vpc
    tags:
      - vpc
      - first

  - name: save the vpc id
    set_fact:
      vpc_id: '{{ new_vpc.vpc.id }}'
      cacheable: yes
The amazon.aws.ec2_vpc_net module creates a VPC with the following parameters listed:
name— to specify the name of the VPCcidr_block— to specify the cidr block for the VPCregion— to specify the region in which the VPC will be createddns_supportanddns_hostnames— to enable DNS support and DNS hostname support respectivelystate— to specify the state of the VPC, use ‘present’ to create the VPC or ‘absent’ to delete it.
You will use register to capture the output to the new_vpcvariable.
The set_fact module allows you to set or create new variables and their values during the execution of the playbook. Here it stores the vpc id of the VPC parsed from new_vpc so that it can be used in other parts of the playbook.
4. Create the subnets.yml file
---
#roles/provision_vpc/tasks/subnets.yml
# Creates two public and two private subnets and stores their subnet ids

  - name: Create two public and two private subnets
    amazon.aws.ec2_vpc_subnet:
      az: '{{ item.az }}'
      cidr: '{{ item.cidr }}'
      vpc_id: '{{ vpc_id }}'
      region: '{{ aws_region }}'
      state: present
      resource_tags:
        Name: '{{ item.name }}'
    loop:
      - { az: '{{ az_01 }}', cidr: '{{ pub_cidr_01 }}', name: '{{ pub_subnet_name_01 }}' }
      - { az: '{{ az_02 }}', cidr: '{{ pub_cidr_02 }}', name: '{{ pub_subnet_name_02 }}' }
      - { az: '{{ az_01 }}', cidr: '{{ priv_cidr_01 }}', name: '{{ priv_subnet_name_01 }}' }
      - { az: '{{ az_02 }}', cidr: '{{ priv_cidr_02 }}', name: '{{ priv_subnet_name_02 }}' }
    tags:
      - subnets
      - first

  - name: Gather facts about the subnets
    amazon.aws.ec2_vpc_subnet_info:
      region: '{{ aws_region }}'
      filters:
        "tag:Name":
          - '{{ pub_subnet_name_01 }}'
          - '{{ pub_subnet_name_02 }}'
          - '{{ priv_subnet_name_01 }}'
          - '{{ priv_subnet_name_02 }}'
    register: subnets_info
    tags: first

  - name: Get the subnet ids
    set_fact:
      priv_01_subnet_id: "{{ subnets_info|community.general.json_query(priv_01)|join(\"\") }}"
      priv_02_subnet_id: "{{ subnets_info|community.general.json_query(priv_02)|join(\"\") }}"
      pub_01_subnet_id: "{{ subnets_info|community.general.json_query(pub_01)|join(\"\") }}"
      pub_02_subnet_id: "{{ subnets_info|community.general.json_query(pub_02)|join(\"\") }}"
    vars:
      priv_01: "subnets[?tags.Name == '{{ priv_subnet_name_01 }}'].id"
      priv_02: "subnets[?tags.Name == '{{ priv_subnet_name_02 }}'].id"
      pub_01: "subnets[?tags.Name == '{{ pub_subnet_name_01 }}'].id"
      pub_02: "subnets[?tags.Name == '{{ pub_subnet_name_02 }}'].id"
    tags: first

  - name: confirm subnets
    debug:
      msg: " private subnets are {{ priv_01_subnet_id }} and {{ priv_02_subnet_id }}, whille public subnets are {{ pub_01_subnet_id }} and {{ pub_02_subnet_id }}"
The amazon.aws.ec2_vpc_subnet module creates subnets in the VPC with the following parameters:
az— to specify the availability zone of each subnetcidr— to specify a distinct CIDR in each subnet (The CIDR of the subnets mustn't overlap)vpc_id— to specify the ID of the VPC in which the subnets are created. The variable{{vpc_id}}listed as the value is from the variable defined with theset_factmodule in vpc.ymlresource_tags— is used to specify tags that will be associated with the subnet such as the name of the subnet.
Theloop keyword is used to iterate over a list of dictionaries (or hashes) where each item in the list contains subkeys that represent the availability zone, CIDR, and name of each of the four subnets to be created.
In Ansible, list of dictionaries can also be written as:
loop: [{ key1:value1, key2:value2 }, { key3:value3, key4:value4 }]
The amazon.aws.ec2_vpc_subnet_info module is used to gather information on the subnets created.
- The
filtersparameter is used to filter the list of the subnets returned by the module based on specific criteria. In this case, the criteria are the names of the individual subnets.
The set_fact module is setting four new variables, as seen above, for later use in the playbook. The community.general.json_query filter — a form of data manipulation in Ansible used to extract specific values from a complex data structure in JSON format, is used to extract the specific subnet ids from the subnet_info variable that was used to capture the information gathered on the subnets. join(\"\") is used to display the subnet id as a string.vars is used to make the filter more readable by defining the JMESPath query separately.
5. Create the igw.yml file
---
#roles/provision_vpc/tasks/igw.yml
# Creates the Internet gateway

  - name: Create an internet gateway
    amazon.aws.ec2_vpc_igw:
      vpc_id: '{{ new_vpc.vpc.id }}'
      region: '{{ aws_region }}'
      state: present
      resource_tags:
        Name: '{{ igw_name }}'
    tags: igw
    register: igw

  - name: store the gateway id
    set_fact:
      igw_gateway_id: '{{ igw.gateway_id }}'
The amazon.aws.ec2_vpc_igw module creates an internet gateway with parameters that define the VPC ID, region, state, and name of the internet gateway.
The internet gateway ID is extracted from the igw variable defined with register and stored in the igw_gateway_id variable to be used later in the playbook.
6. Create the nat.yml file
---
#roles/provision_vpc/tasks/nat.yml
# Create NAT gateway and allocate an elastic ip

  - name: Create a NAT gateway and allocate an elastic IP
    amazon.aws.ec2_vpc_nat_gateway:
      state: present
      subnet_id: '{{ pub_01_subnet_id }}'
      if_exist_do_not_create: true
      wait: yes
      region: '{{ aws_region }}'
    register: nat_gateway
    tags: nat

# making it cacheable in order to use it in the delete playbook
  - name: store nat gateway id
    set_fact:
      nat_gate_id: '{{ nat_gateway.nat_gateway_id }}'
      cacheable: yes
Theamazon.aws.ec2_vpc_nat_gateway module creates the NAT gateway with the following parameters:
stateandregionto specify the state and region in which the NAT gateway is created respectively.subnet_id—to specify the subnet id to create the subnet in. The NAT gateway is usually created in a public subnet.if_exist_do_not_create— to specify whether or not to create a NAT gateway if it already exists in a subnet id. This also allows idempotency.wait— is used to control whether or not the module should wait for the NAT gateway to be created and be in the “available” state before continuing with the playbook.
The NAT gateway ID is stored in the nat_gate_id variable for later use in the playbook.
7. Create the igw_rt.yml file
---
#roles/provision_vpc/tasks/igw_rt.yml
# Create a route table for the internet gateway and associates the public subnets

  - name: Create IGW route table and associate the public subnets
    amazon.aws.ec2_vpc_route_table:
      vpc_id: '{{ vpc_id }}'
      region: '{{ aws_region }}'
      subnets:
        - '{{ pub_01_subnet_id }}'
        - '{{ pub_02_subnet_id }}'
      routes:
        - dest: 0.0.0.0/0
          gateway_id: "{{ igw_gateway_id }}"
      resource_tags:
        Name: '{{ igw_rt_name }}'
    register: IGW_RT
    tags: IGW_RT
Theamazon.aws.ec2_vpc_route_table module creates a route table for controlling the flow of network traffic within the VPC by using the following parameters:
vpc_idandregionto specify the VPC ID and region in which the route table is to be created.subnets— to specify the subnets to be associated with the route table. Here the public subnets are associated.routes— to specify the routes to be added to the route table. It is specified as a list of dictionaries representing a route. Each route dictionary should contain adestandgateway_idkey.destbeing the IPV4 network range for the destination address of the route.gateway_idin this case will be the Internet gateway ID defined in the igw.yml file with theset_factmodule since this is a public route table.
8. Create the nat_rt.yml file
---
#roles/provision_vpc/tasks/nat_rt.yml

# Creates a NAT route table and associates the private subnets

  - name: Create NAT route table
    amazon.aws.ec2_vpc_route_table:
      vpc_id: '{{ vpc_id }}'
      region: '{{ aws_region }}'
      subnets:
        - '{{ priv_01_subnet_id }}'
        - '{{ priv_02_subnet_id }}'
      routes:
        - dest: 0.0.0.0/0
          gateway_id: "{{ nat_gate_id }}"
      resource_tags:
        Name: '{{ nat_rt_name }}'
    register: NAT_RT
    tags: NAT_RT
Here the private subnets are associated, and the NAT gateway ID is used for the gateway_id key in the routes parameter.
9. Create the sg.yml file
---
#roles/provision_vpc/tasks/sg.yml

# Creates security groups for the ec2 instances and the application load balancer

  - name: Load balancer security group
    amazon.aws.ec2_group:
      name: '{{ alb_sg }}'
      description: Security group for the ALB
      vpc_id: '{{ vpc_id }}'
      region: '{{ aws_region }}'
      rules:
        - proto: tcp
          ports:
            - 80
            - 443
          cidr_ip: 0.0.0.0/0
    register: alb_sg
    tags: SG

  - name: store the alb security group name
    set_fact:
      alb_group_id: '{{ alb_sg.group_id }}'
      alb_group_name: '{{ alb_sg.group_name }}'

  - name: EC2 security group
    amazon.aws.ec2_group:
      name: '{{ instances_sg }}'
      description: Security group for the instances
      vpc_id: '{{ vpc_id }}'
      region: '{{ aws_region }}'
      rules:
        - proto: tcp
          ports:
            - 80
            - 443
          group_name: '{{ alb_group_name }}'
    register: instance_sg
    tags: SG

  - name: store the instances security group id
    set_fact:
      instance_group_id: '{{ instance_sg.group_id }}'
The amazon.aws.ec2_group module creates security groups, which are virtual firewall that controls inbound and outbound network traffic to and from your EC2 instances.
name,vpc_id, andregionparameters specify the name of the security group, the VPC ID in which the security group is created and the region respectively.rules— specifies the set of inbound rules to enforce in the security group. It is a list of dictionaries. Each rule dictionary should contain the following keys:protowhich defines the protocol the rules apply to such as “TCP”.portsthat define the port where traffic is going such as “80” for HTTP, and “443” for HTTPS.cidr_ipwhich is the IPV4 CIDR range traffic is coming from andgroup_namewhich is the name of the Security group traffic is coming from.description— specifies the description of the Security group.
The application load balancer’s security group is first created, and the security group name and security group id is extracted and stored using the set_fact module. Then the EC2 instance security group is created, which allows ports 80 and 443 from the application load balancer’s security group.
10. Create the main.yml file
---
#roles/provision_vpc/tasks/main.yml

- include_tasks: vpc.yml
- include_tasks: subnets.yml
- include_tasks: igw.yml
- include_tasks: nat.yml
- include_tasks: igw_rt.yml
- include_tasks: nat_rt.yml
- include_tasks: sg.yml
The main.yml file consolidates all the individual tasks that have been created in the provision_vpc role. It makes use of the include_tasks module to achieve this.
Step Two: Create an AutoScaling Group
To create the autoscaling group, you have to create the launch template first. Launch templates are a way to store and version the launch parameters of an EC2 instance. AutoScaling groups automatically increase or decrease the number of instances in the group based on user-defined policies.
First, you will update host_vars/localhost/vars.yml to include the AutoScaling group variables.
#host_vars/localhost/vars.yml

# Autoscaling group variables

lt_name: "Assignment-LT" #Launch template name
lt_key_name: "exam" #Launch template key name for SSH
lt_instance_type: "t2.micro" #Launch template instance type
lt_image_id: "ami-0b93ce03dcbcb10f6" #ubuntu20.04
asg_name: "Assignment-ASG" #Auto Scaling group name

# User data variables

nginx_display_directory: /var/www/assignment
nginx_source_file: /etc/nginx/sites-available/assignment.conf
nginx_dest_file: /etc/nginx/sites-enabled
domain: yourdomainname
Next, you will move on to creating the launch template and autoscaling group.
Create the autoscaling/ directory in the roles directory.
Create a tasks and templates directory in the autoscaling directory. The templates directory will store the user data script you will use to deploy the web application in Jinja2 format which can include variables defined in the variables file.
In the templates directory, create a user-data.sh.j2 file. The .j2 extension indicates that this file is a Jinja2 template and should be processed as such.
#!/bin/bash
#roles/autoscaling/templates/user-data.sh.j2
# script to install nginx using user data
apt update -y
apt install nginx php7.4 php7.4-fpm -y
systemctl start nginx
mkdir -p {{ nginx_display_directory }}
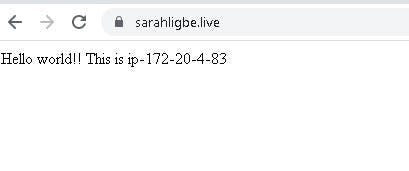
echo "<?php echo 'Hello world!! This is '; echo gethostname(); ?>" | tee {{ nginx_display_directory }}/index.php
printf "server {\n
listen 80 default_server;\n
listen [::]:80 default_server;\n
server_name {{ domain }};\n
root {{ nginx_display_directory }};\n
index index.php;\n
location / {\n
try_files \$uri \$uri/ =404;\n
}\n
location ~ \.php$ {\n
include snippets/fastcgi-php.conf;\n
fastcgi_pass unix:/var/run/php/php7.4-fpm.sock;\n
}\n
}" | tee -a {{ nginx_source_file }}
ln -s {{ nginx_source_file }} {{ nginx_dest_file }}
rm {{ nginx_dest_file }}/default
systemctl reload nginx
The script above will install Nginx and PHP on our servers and then display the hostname of each of the servers.
4. Change directories to the tasks directory and create the launch_template.yml file.
---
#roles/autoscaling/tasks/launch_template.yml

# Creates the launch template

  - name: Create the launch template
    community.aws.ec2_launch_template:
      name: '{{ lt_name }}'
      image_id: '{{ lt_image_id }}'
      key_name: '{{ lt_key_name }}'
      instance_type: '{{ lt_instance_type }}'
      security_group_ids: '{{ instance_group_id }}'
      user_data: "{{ lookup('ansible.builtin.template', 'user-data.sh.j2')| b64encode }}"
      region: '{{ aws_region }}'
    register: launch_temp
    tags: lt

  - name: store the launch template id
    set_fact:
      launch_temp_id: '{{ launch_temp.latest_template.launch_template_id }}'
The community.aws.ec2_launch_template module can create launch templates with the following parameters:
nameandregion— specifies the name and region of the launch template respectivelyimage_id— specifies the image ID of the AMI to be used in the launch templatekey_name— specifies the name of the SSH key for the launch template. There is no need to add the .pem extensioninstance_type— specifies the instance type of the launch template such as “t2.micro”security_group_ids— specifies the security group to be associated with the instances created from the launch template. The security group ID value is the instance_group_id variable created with theset_factmodule in the sg.yml fileuser_data— which specifies the user data to be used by the instances.lookupplugin is being used to retrieve the contents of theuser-data.sh.j2file from the templates directory. The contents of this file are then passed through theansible.builtin.templatelookup plugin, which processes the Jinja2 template code, replacing any variables with their corresponding values. The resulting output is then passed through theb64encodefilter, which encodes the data in base64 (the user data must be base64 encoded). The final output, which is the base64 encoded user data, is then passed as the value of theuser_dataparameter to thecommunity.aws.ec2_launch_templatemodule.
The launch template ID from the output is stored in the launch_temp_id variable.
5. Create the asg.yml file
---
#roles/autoscaling/tasks/asg.yml

# Create an autoscaling group in the private subnets using the launch template

  - name: Create autoscaling group
    community.aws.ec2_asg:
      name: '{{ asg_name }}'
      availability_zones: [ '{{ az_01 }}', '{{ az_02 }}' ]
      launch_template:
        launch_template_id: "{{ launch_temp_id }}"
      min_size: 2
      max_size: 5
      desired_capacity: 2
      vpc_zone_identifier: [ '{{ priv_01_subnet_id }}', '{{ priv_02_subnet_id }}' ]
      health_check_type: ELB
      health_check_period: 120
      wait_for_instances: true
      region: '{{ aws_region }}'
    register: autosg
    tags:
      - SG
      - autosg

  - name: store the instance id
    set_fact:
      asg_instance_id: '{{ autosg.instances }}'
    tags:
      - autosg
      - SG
( The community.aws.ec2_asg module redirects to the amazon.aws.autoscaling_group module. If your ansible-core version is between 2.12.0 and 2.13.0, you can use community.aws.ec2_asg . If it is >2.14.0, use amazon.aws.autoscaling_group instead ).
The community.aws.ec2_asgmodule creates auto-scaling groups with the following parameters:
nameandregionspecifies the name and region of the AutoScaling groupavailability_zones— specifies the availability zones of the instances in the AutoScaling group. From the architecture diagram, the AutoScaling group spans two availability zones.launch_template— specifies the launch template to be used. It has a sub-parameter that specifies the launch template ID(which was stored in the launch_temp_id variable).min_size— specifies the minimum number of instances that should be running in the AutoScaling group at any given time.max_size— specifies the maximum number of instances that should be running in the AutoScaling group at any given time. The AutoScaling group will not launch more instances than this number.desired_capacity— specifies the number of instances that the AutoScaling group should try to maintain.vpc_zone_identifier— specifies which subnets the AutoScaling group instances should be launched in. It is a list of subnet IDs, where each subnet corresponds to a subnet in a VPC within a particular availability zone. The private subnet IDS are used.health_check_type— specifies whether or not an instance is running and responding to requests. The AutoScaling group uses the “ELB” option to know whether the instance is healthy as reported by the Elastic load balancerhealth_check_period— specifies the length of time, in seconds, that the Auto Scaling group should wait between checking the health status of an instancewait_for_instances— specifies whether or not the module should wait for the instances to be in a ready state before continuing with the playbook.
The instance IDs of the instances extracted are stored in the asg_instance_id variable (it is stored as a list since there are multiple instances).
6. Create the main.yml file
---
#roles/autoscaling/tasks/main.yml

- include_tasks: launch_template.yml
- include_tasks: asg.yml
Step Three: Create the Application Load Balancer
To create the application load balancer, you must first create a target group. Target groups are used in conjunction with load balancers to help route traffic to the resources in the group. These resources could be EC2 instances.
To begin, you’ll update the host_vars/localhost/vars.yml file to include the load balancer variables
#host_vars/localhost/vars.yml

# Application load balancer variables

tg_name: "Assignment-TG"
alb_name: "Assignment-ALB"
Next, you will move on to creating the target group and then the application load balancer.
In the roles/ directory, create the load_balancer/tasks directory
cd into tasks/ and create the target_groups.yml file
---
#roles/load_balancer/tasks/target_groups.yml

# Creates a target group for the application load balancer

  - name: Create the target group for the load balancer
    community.aws.elb_target_group:
      name: '{{ tg_name }}'
      protocol: http
      port: 80
      vpc_id: '{{ vpc_id }}'
      health_check_protocol: http
      health_check_path: /
      successful_response_codes: "200,250-260"
      targets:
        - Id: '{{ asg_instance_id[0] }}'
          Port: 80
        - Id: '{{ asg_instance_id[1] }}'
          Port: 80
      state: present
      region: '{{ aws_region }}'
    register: tg
    tags:
      - SG
      - tg
  - name: store the target group name
    set_fact:
      tg_group_name: '{{ tg.target_group_name }}'
      tg_group_arn: '{{ tg.target_group_arn }}'
Thecommunity.aws.elb_target_group module creates and manages target groups for the application load balancer with the following parameters:
nameandregion— specifies the name and region in which the target group is created respectivelyprotocolandport—specifies the protocol that routes incoming traffic to the target group and the port on which the target group should listen for incoming traffic respectivelyhealth_check_protocolandhealth_check_path— specifies the protocol the load balancer uses to check the health of registered targets, and the path on the targets for the health checks respectivelysuccessful_response_codes— specifies the HTTP response code that should be considered a successful response from your targetstargets— specifies the targets (EC2 instances in this case) that should be registered with the target group. The value of this parameter is a list of dictionaries, where each dictionary represents a target. The subkeyiddefines the ID of the instances (you stored the instance ID from asg.yml output in a list asg_instance_id. You can reference each instance based on their index). Theportvalue should match theportparameter defined earlierstate— specifies the state of the target group.
The target group name and Amazon Resource Name (ARN) are stored for later use in the playbook using the set_fact module.
3. Create the alb.yml file
---
#roles/load_balancer/tasks/alb.yml

# Creates the application load balancer in the public subnets for the two availability zones in the vpc

  - name: Create the load balancer
    community.aws.elb_application_lb:
      name: '{{ alb_name }}'
      security_groups: '{{ alb_group_id }}'
      subnets:
        - '{{ pub_01_subnet_id }}'
        - '{{ pub_02_subnet_id }}'
      listeners:
        - Protocol: HTTP
          Port: 80
          DefaultActions:
            - Type: forward
              TargetGroupName: '{{ tg_group_name }}'
      state: present
      region: '{{ aws_region }}'
      wait: true
      wait_timeout: 300
    register: new_alb
    tags:
      - SG
      - alb

  - name: store the alb dns name and hosted zone id
    set_fact:
      alb_dns: '{{ new_alb.dns_name }}'
      alb_hosted_zone_id: '{{ new_alb.canonical_hosted_zone_id }}'

  - name: Add the target group to the autoscaling group
    community.aws.ec2_asg:
      name: '{{ asg_name }}'
      target_group_arns: '{{ tg_group_arn }}'
      region: '{{ aws_region }}'
    tags:
      - SG
( The community.aws.elb_application_lb module redirects to the amazon.aws.elb_application_lb module. If your ansible-core version is between 2.12.0 and 2.13.0, you can use community.aws.elb_application_lb . If it is >= 2.14.0, use amazon.aws.elb_application_lb instead).
Thecommunity.aws.elb_application_lb module creates and manages the application load balancer with the following parameters:
nameandregion— specify the name and region in which the load balancer is created respectivelysecurity_group— specifies the security group to be associated with the load balancer. The value references the security group ID you created in asg.ymlsubnets— specifies the subnet IDs in which the load balancer should be created. The subnet IDs should span at least two availability zones to ensure high availability. The public subnet IDs are usedlisteners— specifies the listeners to be associated with the Application load balancer. The value of this parameter is a list of dictionaries. The key-value pair of each dictionary is case-sensitive.
Use the set_fact module to store the dns_name and canonical_hosted_zone_id return values, which specify the DNS name and the Amazon Route 53 hosted zone ID you want to use as the alias target for the Application Loadthelancer.
4. Create the main.yml file
---
#roles/load_balancer/tasks/main.yml

- include_tasks: target_groups.yml
- include_tasks: alb.yml
Step Four: Create Route53 Records
AWS Route53 is a simple and reliable way for end users to access internet applications by translating domain names to the IP addresses of the servers hosting those applications.
To create a Route53 record for the Application load balancer, you must first create a hosted zone.
In the roles/ directory, create the route53/tasks/ directory.
cd into the tasks/ directory and create the main.yml file (yes, you can also explicitly define your tasks in the main.yml file instead of using the include_tasks module).
---
#roles/route53/tasks/main.yml

# Create a route53 hosted zone and an A record for the application load balancer
  - name: Create route53 hosted zone
    community.aws.route53_zone:
      zone: '{{ domain }}'
    register: hosted_zone_name
    tags: route53

  - name: Create an alias record that points to the ALB
    community.aws.route53:
      state: present
      hosted_zone_id: '{{ hosted_zone_name.zone_id }}'
      record: '{{ domain }}'
      type: A
      overwrite: true
      value: '{{ alb_dns }}'
      alias: True
      alias_hosted_zone_id: '{{ alb_hosted_zone_id }}'
    register: route53_info
    tags: route53

  - name: get nameservers
    community.aws.route53:
      zone: '{{ domain }}'
      record: '{{ domain }}'
      type: A
      state: get
    register: nameserver
    tags: route53

  - name: store the credentials
    set_fact:
      nameservers_1: '{{ nameserver.nameservers }}'
      ttl_1: '{{ nameserver.set.ttl }}'
      type_1: '{{ nameserver.set.type }}'
      value_1: '{{ nameserver.set.value }}'
      cacheable: yes

  - name: display nameservers
    debug:
      msg: "Here are your nameservers: {{ nameservers_1 }}"
    tags: route53
( The community.aws.route53_zone and community.aws.route53 modules redirect to amazon.aws.route53_zone and amazon.aws.route53 respectively. If your ansible-core version is > 2.14.0, use amazon.aws.route53_zone and amazon.aws.route53 instead).
The community.aws.route53_zone creates the Route53 public hosted zone with the following parameters:
zone— specifies the domain name of the hosted zone to be created.
Theregister module captures the output of the module to use it with the community.aws.route53 module.
The community.aws.route53 creates the A record in your defined hosted zone with the following parameters:
zone— specifies the domain name in which the record is createdrecord— specifies the full DNS record to create. The value can either be a subdomain or just the domain name itselftype— which specifies the type of record to create. Yours is an “A” recordoverwrite— specifies whether or not to overwrite an existing record. Initially, the value was set to false but running the playbook again resulted in an error because the record already existed so overwrite was set to true, it doesn’t break anything since the record is still pointing to the same Application Load Balanceralias— specifies whether or not this is an alias record. It is, since you’re not translating the domain name to an IP address but the load balancer’s DNS namealias_hosted_zone_id— specifies the target hosted zone ID. We defined this in the alb.yml file using theset_factmodule.
The next task sets thestate parameter to “get” to capture the output from the hosted zone created. The nameservers are then saved using the set_fact module.
The last task displays the nameservers of the hosted zone. Use these nameservers to update your domain provider (e.g., Name.com), which will tell Internet service providers around the world to route traffic aimed at your domain name to AWS Route53’s nameservers. This process is known as DNS Propagation.

Step Five: Request a Public Certificate from AWS Certificate Manager and update the Application Load Balancer Listeners
AWS Certificate Manager (ACM) is a service that allows you to easily provision, manage, and deploy Secure Sockets Layer or Transport Layer Security (SSL or TLS) certificates for use with AWS services.
You have the option to either import a certificate or request a new public certificate from AWS. Since Ansible does not have a module for requesting a new public certificate using ACM at the time of writing, you’ll use the AWS CLI to request the certificate through Ansible’s shell module. Ensure that you have already configured the AWS CLI as stated in the prerequisites
In the roles/ directory, create the ssl/tasks/ directory
In the tasks/ directory, create the main.yml file
---
#roles/ssl/tasks/main.yml

# Ansible does not have a module to request a public certificate from aws certificate manager, hence the use of the cli
  - name: Request a public certificate
    shell: |
      aws acm request-certificate \
      --domain-name "{{ domain }}" \
      --validation-method DNS \
      --region "{{ aws_region }}" \
      --domain-validation-options DomainName={{ domain }},ValidationDomain={{ domain }} \
      --idempotency-token prevail
    register: new_acm
    tags:
      - route53
      - ssl

# Create a CNAME record while the certificate is still pending validation

  - name: Get the Certificate ARN
    set_fact:
      certificate_arn: '{{ (new_acm.stdout|from_json).CertificateArn }}'

  - name: Retrieve information about the requested certificate
    shell: |
      aws acm describe-certificate --certificate-arn '{{ certificate_arn }}' --region '{{ aws_region }}'
    register: certificate_details
    retries: 13
    delay: 10
    until: (certificate_details.stdout|from_json).Certificate.DomainValidationOptions[0].ResourceRecord.Name is defined
    tags: ssl

  - name: Create DNS(CNAME) record in route53
    community.aws.route53:
      state: present
      ttl: 120
      zone: '{{ (certificate_details.stdout|from_json).Certificate.DomainValidationOptions[0].ValidationDomain }}'
      record: '{{ (certificate_details.stdout|from_json).Certificate.DomainValidationOptions[0].ResourceRecord.Name }}'
      type: '{{ (certificate_details.stdout|from_json).Certificate.DomainValidationOptions[0].ResourceRecord.Type }}'
      value: '{{ (certificate_details.stdout|from_json).Certificate.DomainValidationOptions[0].ResourceRecord.Value }}'
      wait: yes
    tags: ssls

  - name: Wait for the certificate's status to become ISSUED
    shell: |
      aws acm describe-certificate --certificate-arn '{{ certificate_arn }}' --region '{{ aws_region }}'
    register: certificate_details
    retries: 85
    delay: 20
    until: (certificate_details.stdout|from_json).Certificate.Status == "ISSUED"
    tags: ssl

# Update the application load balancer with https listeners and add a rule that redirects http

  - name: Update the ALB to redirect http traffic to https
    community.aws.elb_application_lb:
      name: '{{ alb_name }}'
      region: '{{ aws_region }}'
      security_groups: '{{ alb_group_id }}'
      subnets:
        - '{{ pub_01_subnet_id }}'
        - '{{ pub_02_subnet_id }}'
      listeners:
        - Protocol: HTTPS
          Port: 443
          SslPolicy: ELBSecurityPolicy-2016-08
          DefaultActions:
            - Type: forward
              TargetGroupName: '{{ tg_name }}'
          Certificates:
            - CertificateArn: '{{ certificate_arn }}'
        - Protocol: HTTP
          Port: 80
          DefaultActions:
            - Type: forward
              TargetGroupName: '{{ tg_name }}'
          Rules:
            - Conditions:
                - Field: path-pattern
                  Values:
                    - "/*"
              Priority: '1'
              Actions:
                - Type: redirect
                  RedirectConfig:
                    Protocol: "HTTPS"
                    Port: "443"
                    Host: "#{host}"
                    Path: "/#{path}"
                    Query: "#{query}"
                    StatusCode: "HTTP_301"
The shell module is used to run the aws acm commands.
The aws acm request-certificate command requests a certificate for you from ACM with the following options:
--domain_name— specifies the domain name to request the certificate for. This could be a subdomain or your domain itself--validation-method— specifies the method to validate that the domain name belongs to you. You could choose either DNS or Email validation. DNS is a better choice--region— specifies the region to request the certificate in--domain-validation-options— specifies the options that are required to validate your domain name. The list includes theDomainNamewhich is your domain name andValidationDomainwhich could be the same as your domain name or a superdomain if you are requesting the certificate for a subdomain--idempotency-token— specifies a token generated by you to ensure idempotency between request calls for a certificate. It typically times out after one hour.
The register module captures the output from running the command so that it can be used in other parts of the playbook.
The Certificate’s Amazon Resource Name(ARN) is stored with the set_fact module from the standard output (stdout) of the variable defined with the register module.
Remember earlier you configured the AWS CLI to output in JSON format, hence why we’re using the from_json ansible filter to manipulate the data to extract the ARN.
You will need to retrieve information about the just-created certificate to create a DNS CNAME record in Route53.
You will use the aws acm describe-certificate command in the ansible shell module to achieve this with the following options:
--certificate-arn— specifies the ARN of the certificate created (which we saved with theset_factmodule). This option has to be specified to run the command--region— specifies the region in which the certificate was created.
The register module captures the output of the command.
The retries module is used to retry a task until a condition is met. This module works hand-in-hand with delay which specifies the time, in seconds, the tasks are to be retried, and until which specifies the condition to be met.
The task is to be retried 13 times, every 10 seconds until the ResourceRecord Name in the output of the command is defined ( That’s 130 seconds = 2 minutes, 10 seconds).
You will then create the DNS record in Route53 using the community.aws.route53 module. The ttl parameter (time-to-live) specifies the time in seconds that a record should be cached by resolvers and other DNS clients. The zone , record , type , and value parameters are parsed from the output of the aws acm describe-certificate command captured with the register module.
Now you will wait for the certificate to become issued. You’ll use the aws acm describe-certificate along with the retries , delay , and until modules to wait for the output’s “status” to change from PENDING_VALIDATION to ISSUED.

The task is to be retried 85 times, every 20 seconds until the Status equals ISSUED. (That’s about 1700 seconds = 28 minutes 20 seconds)

The task was only tried twice before the condition was met.
Finally, you’ll update your Application Load Balancer to include an HTTPS listener and redirect HTTP to HTTPS.
You’ll have to specify the name , region , subnets , and security_groups parameters again in the community.aws.elb_application_lb module to enable Ansible to recognize which Application Load Balancer you want to update.
In the first item in the listeners parameter list, the SslPolicy and Certificates subkeys are added alongside the Protocol , Port , and DefaulActions subkeys.
The
SslPolicy— specifies the security configurations that determine how the load balancer should handle SSL/TLS connections. AWS recommends ELBSecurityPolicy-2016–08Certificates— specifies the SSL certificate for an Application Load Balancer. We’ll use the ACM certificate ARN.
In the second item in the listeners parameter list, you will specify the Protocol , Port , and DefaultActions subkeys of the HTTP listener that you want to redirect to HTTPS. You will use the Rules subkey to define a set of rules for the redirection.
The Rules subkey is defined with the following parameters:
Conditions— specifies the conditions to be met before the rules can be applied. TheFieldkey specifies the criteria used to match incoming requests to the rule, such as the host header, path, or query string. You’re matching incoming requests to the “/*” path condition which means that the rule will match any incoming request regardless of its pathPriority— specifies the order in which rules are evaluated, with the rule having the highest priority being evaluated first. Rules with the lowest value have the highest priority, while the default rule is always evaluated last. Thepriorityvalue is set to ‘1’, hence this rule will be evaluated first.Actions— the action that should be taken when a request matches the conditions specified in theConditionssubkey. TheTypeof action is set toredirect. This redirects the HTTP traffic to the HTTPS traffic with the sameHost,Path, andQueryparameters. TheStatusCodeis set to "HTTP_301", which is used for permanent redirects.
Step Six: Include the Roles in the main.yml file
The last step in writing the playbook is to include all the roles in the main.yml file
---
#main.yml

- name: Provisioning AWS resources using Ansible
  hosts: localhost
  connection: local
  gather_facts: False

  roles:
    - name: Create a logical network
      role: provision_vpc
    - name: Create an autoscaling group
      role: autoscaling
    - name: Create an application load balancer
      role: load_balancer
    - name: Link the load balancer to route53
      role: route53
    - name: Create a certificate manager, add it to the load balancer      and update load balancer rules
      role: ssl
Now that you have your complete playbook, the next thing is to run the playbook.
ansible-playbook main.yml
After running the playbook you should have all the necessary AWS resources provisioned and your domain name should be up and running.